Tuesday, October 1, 2013
I've been missing you!
Wow guys, I've been MIA for a very long time. I am really excited to get back into this and begin again with my all time favorite holiday! HALLOWEEN!!! Get ready for handprints and footprints turned into everything cute you can imagine. It's time for pumpkin patch trips, leave gathering walks, and dress up! Get ready for this exciting time with my new class of kiddos.
Wednesday, April 20, 2011
Hoppy Easter! Or just a springtime activity.
I don't know about you but my favorite spring time activity is making bunnies. I love the cotton balls and the way the kids glue them on and are so proud when they are done. To keep the bunnies 3d this year I made them out of a paper cup. It isn't like I want these materials to get boring, I just want you to use all of the ones that you bough, so as not to waste.
Necessary Items For This Project:
A white paper cup
Cotton balls
Glue
White paper for ears
Pink crayon to color in ears
Objects For Extra Pizazz
Googly Eyes
Plastic Lacing thread (Whiskers)
Colored Cotton Balls (for a dramatic effect ;))
To start out I freehand cut out the bunny ears and glued them on to the cups.


So when they had some time to dry I glued the googly eyes on the cotton balls, or on the paper cup itself. The whiskers were a fun addition. I used purple lacing thread and made 4 strand whiskers. I wish we would have had fishing line to make them clear. Here is the whole class of bunnies. So cute.

Necessary Items For This Project:
A white paper cup
Cotton balls
Glue
White paper for ears
Pink crayon to color in ears
Objects For Extra Pizazz
Googly Eyes
Plastic Lacing thread (Whiskers)
Colored Cotton Balls (for a dramatic effect ;))
To start out I freehand cut out the bunny ears and glued them on to the cups.
The cutting and the coloring of the ears was nothing special. You could add glitter or foam paint on the ears to make them stand out a little more. I have to make 10 for my classroom so here are the school of nakie bunnies...
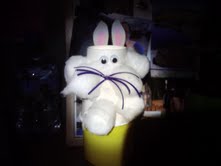
Next I had the kids paint the cups with glue. We then stuck the cotton balls and other white collage material(like packing peanuts, white pom poms and plox) to the cup. Some kids got crazy. This one is my favorite. We couldn't even find the ears.
So when they had some time to dry I glued the googly eyes on the cotton balls, or on the paper cup itself. The whiskers were a fun addition. I used purple lacing thread and made 4 strand whiskers. I wish we would have had fishing line to make them clear. Here is the whole class of bunnies. So cute.
(Never mind the blue tape on the one in the middle, we had to put it on to keep the beehive hair to dry appropriately)
Here is a close up
(Again sorry about the nap time picture!)
Have A Hoppy Easter!
Friday, April 15, 2011
Just as I promised! Butterfly Friday.
I know there is about 1000 ways to make a butterfly but this idea came to me the other week and I tried it in the classroom as a two day project. Every day at circle time we do some yoga to try and bring the energy down from playing outside. We do the butterfly yoga pose which looks like this, however with the hands on their shoulders to flap their wings

We talked a lot about their bodies and then talked about butterfly bodies and how they were different. We read "The Very hungry Caterpillar" and then saw how the caterpillar transformed. The first day all we needed for the project was the paint and the toilet paper roll. We painted them and talked about the bodies and how we were giving the butterfly bodies some gentle touches with our brushes to maintain the clam. A few kids mentioned that they were caterpillars and were going to be butterflies soon. That was adorable.
On the second day I prepped in the morning. I folded the contact paper in half and cut out B shapes for the wings. I taped the contact paper sticky side up on the table so they could add all of their little pieces. We used crinkle paper and tissue paper squares. No one was really interested in the buttons on that particular day. They picked their items and collaged for a good 20 minutes sticking and re-sticking their items in just the right place. After they were through we backed them with construction paper in various colors. It would have been equally awesome to back it with another piece of contact paper, however for all of my kiddos it would have taken me an eternity :). Here is how they turned out.

I'm sure you've already guessed that I am a google eye fan, however these are cute as well. They are eye stickers from Discount School Supply. I hole punched and added the pipe cleaner antenna and a little smile as well. We hung them from a clothesline in our classroom and the kids can not stop commenting on them.

Have a happy butterfly friday!
Thursday, April 14, 2011
Get prepared for the next project! My hearts a flutter...
For the next project you are going to need a toilet paper roll, or if your doing it for multiples peper towel rolls cut in half. Also get some springtime colored paint, contact paper, and some random, small, colorful objects from around the house. I like buttons, hole puncher dots, tissue paper scraps, magazine cuts outs, ect.
Find your copy of

Find your copy of
so we can get prepared. Ill post tomorrow with the project :)
Have a great day, and get creating!
Wednesday, April 13, 2011
Whats all the BUZZ about spring?
Hey Guys,
Its time for my first project post. Today we are focusing on springtime and read the book Maisy's ABC's by Lucy Cousins.


Its time for my first project post. Today we are focusing on springtime and read the book Maisy's ABC's by Lucy Cousins.
My class absolutly loves her books as they have very bright and vivid pictures and often have flaps or something animated about each page. I love them becasue I swear there is nothing that you cannot find in those books, especially when you are trying to tie the book at circle time in with the project everyday. On the insect page there is a bee and with the pull tab the bee flies. This blew their little minds.
We made bees our of paper cups. I love making 3D art projects with them becasue I feel like they keep their attention just a little more and they seem to enjoy learing how to get the medium on the surface and getting it to stick.
For this project you'll need :
1 paper cup - white on the outside
Sharpie- for drawing the bee lines
Yellow Paint
Paper to cut out the wings
Extras for a little pizzaz :
1 pipe cleaner for the antenna
2 googy eyes- I mean come on, they make every toddler project amazing!
I started by drawing the lines of the bees around the cups. 

(Sorry about the naptime photo)
I made three but you can do whatever you please. Then I had the kids paint them yellow. I like the Colorations Super Shiney Yellow Paint.
Then I cut wings out of grey construction paper, however I think wings out of wax paper look awesome too. Added some googly eyes and drew a smile. I taped some black pipe cleaners to the top for antenna and they stay pretty well with xcotch tape. They love them and smile every time they see them :) Here is the finished product.
I hope you enjoy the project!
Friday, April 8, 2011
Welcome to my BLOG!
First let me welcome you to what I hope will be a wonderful resource for teachers in my situation. As a toddler teacher I feel that a lot of the art projects I am finding are geared towards older children. I strive to stay away fromthe typical markers, crayons, and copier paper projects. I am sofocused on getting and keeping my childrens attention with colorful, fun, and innovative projects. Keep checking back for progress on my projects and ideas to help you with your classrooms as well.
Thanks!
Jenna
Thanks!
Jenna
Subscribe to:
Posts (Atom)